Activating Machines
Use Keygen's API and your code to implement machine activation for your product. If you need help after reading this, can reach out to us anytime at [email protected].
Validation and activation flow
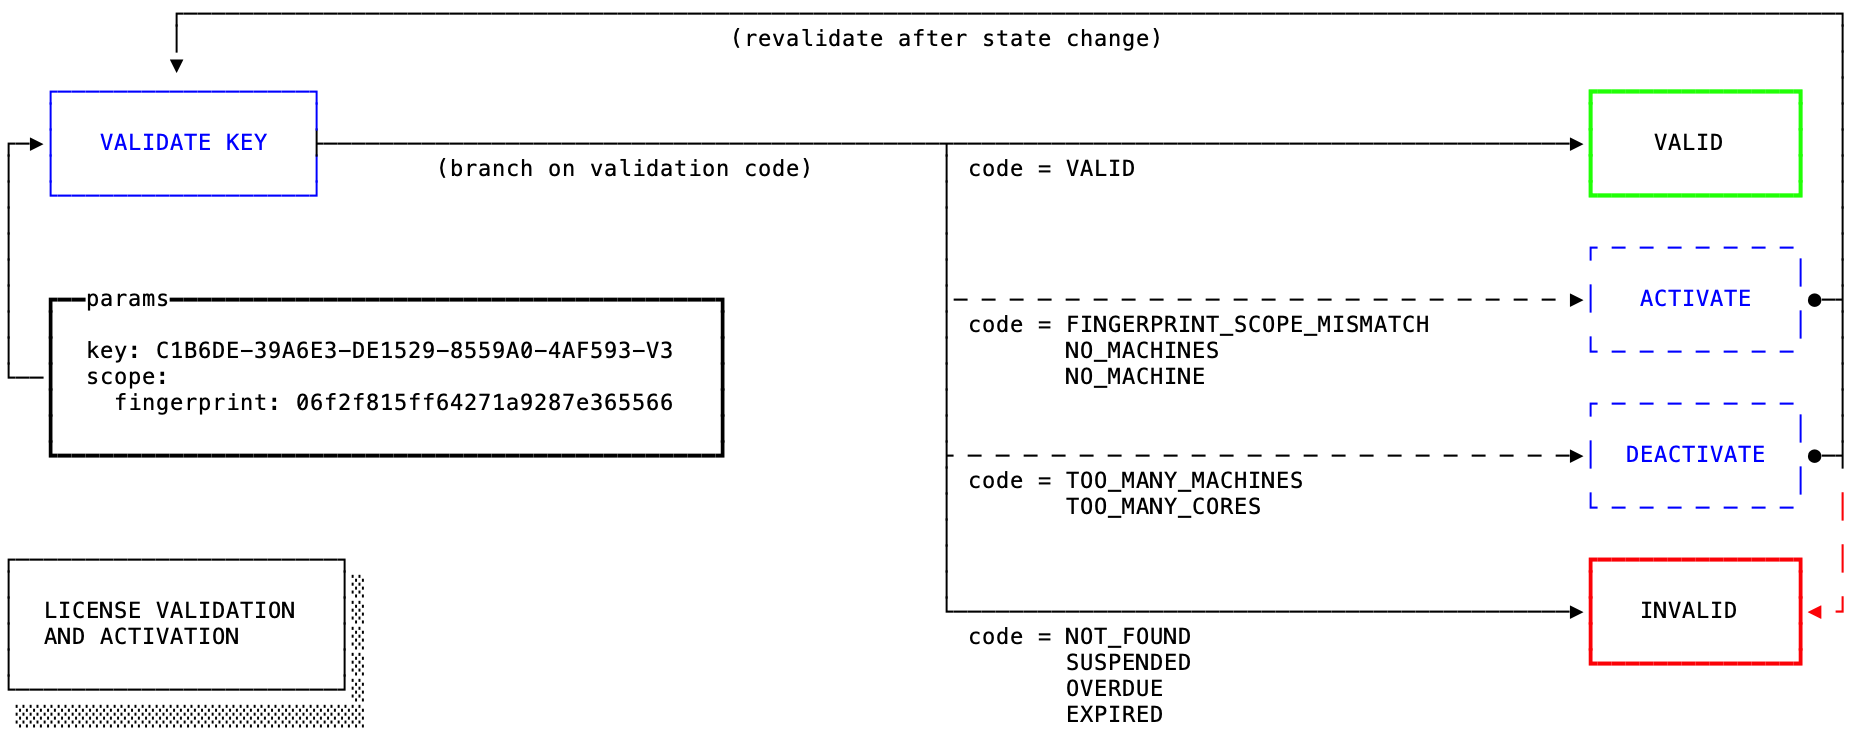
Once you've created a license, you can "activate" individual machines for your product to be used on, making it easier for you to implement a node-locked or floating licensing model. Although Keygen doesn't use the term "activation" much in our resource documentation, machine creation accomplishes the same thing, while machine deletion would be "deactivation."
Implementing a node-locked or node-limited license model consists of 3 to 4 separate steps, each done in a separate API request:
- Create the license - this is the step where you create the user's license resource, typically done server-side after you've received a payment, or after they've registered for an account with you.
- Validate their license - this step should be initiated client-side from within your software (e.g. prompt them for a license key after starting your software), and can be performed both before and after activation. Validating before activation so you can be sure the license supports another machine; validating after activation to ensure the newest activation didn't invalidate the license.
- Activate their machine - this step should be initiated from within your software, so you can have access to the underlying machine to be able to query information such as device GUID, MAC address, HDD ID, etc. for use in fingerprinting the user's current machine.
Activation requests can either be performed client- or server-side, and depending on which one of those you choose, the tokens you use to make the request will be different i.e. product tokens vs. user tokens vs. license tokens, for server-side and client-side machine activations.
How to identify a device
When activating a machine (device), you will at minimum need a license ID for the license the activation is for, and a fingerprint for the current device. Other machine attributes, such as name, IP or hostname, are completely optional.
In the activation example (next section), we'll be using a SHA256 hash of the
current device's native globally unique identifier (GUID) as a fingerprint.
We're hashing the ID as a simple way to anonymize it, since we have no real use
in knowing its actual value. Using an HMAC digest (i.e. HMAC-SHA256) might
be an even better way to anonymize the fingerprint.
Although we're using a machine's unique machine GUID in this example, a fingerprint can be any unique string able to be reproducibly queried from the device, e.g. you could write a secure random string to a file on disk or to a registry and use that, but for most purposes the machine GUID works well.
(For cloud and virtualized environments, you may want to look at alternative fingerprinting methods, since hardware can be shared or cloned between hosts. More on activation in virtual and cloud environments is covered here.)
Using macOS, you can obtain the native machine GUID (under property IOPlatformUUID)
with the following shell command:
ioreg -rd1 -c IOPlatformExpertDeviceThere are packages that can query the machine GUID across various platforms:
- For C# apps, you can access the machine GUID using the DeviceId package via
AddMachineGuid(). - For Python, we maintain a package called py-machineid.
- For Node, there's the node-machine-id package.
- For Go, there's the machineid package.
If you want to use something different — that's totally fine! What makes up a machine "fingerprint" is up to you. As long as it's a unique value that has a low likelihood of changing, it will work fine.
For example, storing a random UUID to disk may be the simplest solution for some products, but that may not work for other products. The MAC address is a commonly used fingerprint, but please note that it can change.
A machine can always be deactivated in the event that a fingerprint changes due to hardware, network or operating system changes.
How to activate a device
Below is an example of performing a machine activation request.
curl -X POST https://api.keygen.sh/v1/accounts/<account>/machines \ -H 'Content-Type: application/vnd.api+json' \ -H 'Accept: application/vnd.api+json' \ -H 'Authorization: License C1B6DE-39A6E3-DE1529-8559A0-4AF593-V3' \ -d '{ "data": { "type": "machines", "attributes": { "fingerprint": "f1adc3aed0ba31a418fc7c2e1d63c3e0b1207a6cea5613f650945235f1812fcd", "name": "Office Mac Pro", "platform": "macOS" }, "relationships": { "license": { "data": { "type": "licenses", "id": "4097d726-6cc5-4156-8575-3a96387e19b4" } } } } }'Example applications
Below you can find example applications detailing machine activation in various programming languages. These may be a great place to start.
Electron Examples
Node Examples
Python Examples
C# Examples
PHP Examples
Rust Examples
Go Examples
C++ Examples
Shell Examples
Next steps
That's that! You've activated your first machine using Keygen. Next up, we could update a license's policy to require a machine fingerprint during validating using the "require fingerprint scope" setting, or adjust the license's maximum machine limit.
If you have any questions about what you've learned today, be sure to reach out!